

Tabla de contenido
[zoomsounds id=”how-to-create-an-online-restaurant-ordering-system-in-woocommerce”]
If you have a website for your restaurant, you’ll want to consider offering an online ordering system. Your customers will appreciate the convenience of being able to choose what they want directly from your site. However, it may not be immediately clear how to set up this type of system.
Fortunately, creating an online restaurant ordering system is quite simple. In fact, all you need is a WordPress website with WooCommerce and the WooCommerce Product Table. With this set of tools, you will be able to create and customize a web page where people can order what they want and pay for it in just a few minutes.
In this guide, we’ll talk a bit about how a custom ordering system can benefit your restaurant business. We will then guide you through the setup process. Let us begin!
Benefits of using an online restaurant ordering system
There is no denying the growing popularity of ordering food online. Whether it’s for pickup or delivery, people love being able to place an order quickly and get on with their lives.
63% of Spaniards have ordered takeout via a website or app, for example, and roughly 20% use food delivery services at least once a week. The numbers in America will be very similar.
So if you have the resources, offering an online ordering option is a smart move. However, you’re not likely to be very successful if you don’t design your online restaurant ordering system carefully.
As it stands, most platforms aren’t designed to do this easily. Take WooCommerce for example: it allows you to quickly turn your website into an online store. However, it is designed to sell individual products or services. Customers have to visit separate pages for each item they want, which is not ideal when ordering food.
That’s why you’ll need an additional tool, one that will help you design a one-page ordering system that works like an online menu.
An Introduction Woocommerce Product Table
(the WooCommerce product table)
This plugin is designed to integrate with WooCommerce and offer additional functionality. More specifically, it allows you to create a product table that displays all of your items or services on a single page. For your restaurant site, this means you can list all of your dishes and other offerings on one online menu.
The benefits of using WooCommerce Product Table to set up your ordering system include:
- All your dishes will be presented on a page similar to a menu.
- You can customize exactly what information is displayed about each item.
- Customers can select as much as they want and add it all to your cart with one click.
If you want to set up an online restaurant ordering system, WooCommerce Product Table can help you: https://www.youtube.com/watch?v=b4z25OGCGuk
Best of all, creating this type of ordering system is quick and easy. If you already have information and images on hand about each item on your menu, you can have a custom product table up and running in no time.
Let’s take a look at what that process entails.
How to Create a WooCommerce Restaurant Ordering System (in 3 Steps)
Before we get started, let’s cover some initial steps you’ll need to take. We will assume that you already have a WooCommerce website set up for your restaurant. If not, you’ll want to make sure you do the following:
- Configure WordPress
- Install WooCommerce on your website
- Add each item in your menu as an individual product in WooCommerce.
When your WooCommerce website is ready, you can move on to the first step!
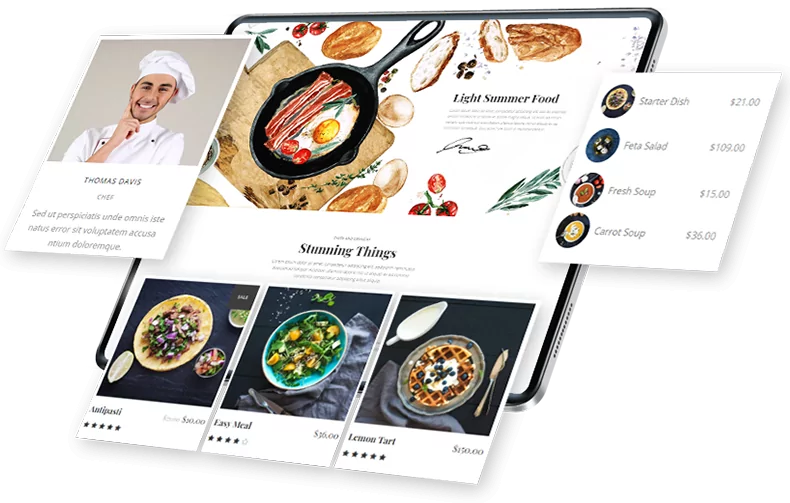
A Michelin Restaurant Website
Do you need a redesign or a new website for your restaurant?
Complete solution for retail and wholesale. Great UX/UI designers, experienced programmers and high emphasis on testing. If you are looking for a tasty & luxury website for your restaurant, with most advanced functionality, contact us!
Step 1 – List Your Restaurant Menu on a Table
First, you will need to purchase the WooCommerce Product Table Plugin and install it on your website. Once the plugin is activated, you can navigate to WooCommerce> Settings on your dashboard.
Select the Product tab, and click “Product Tables” in the menu at the top of the page:
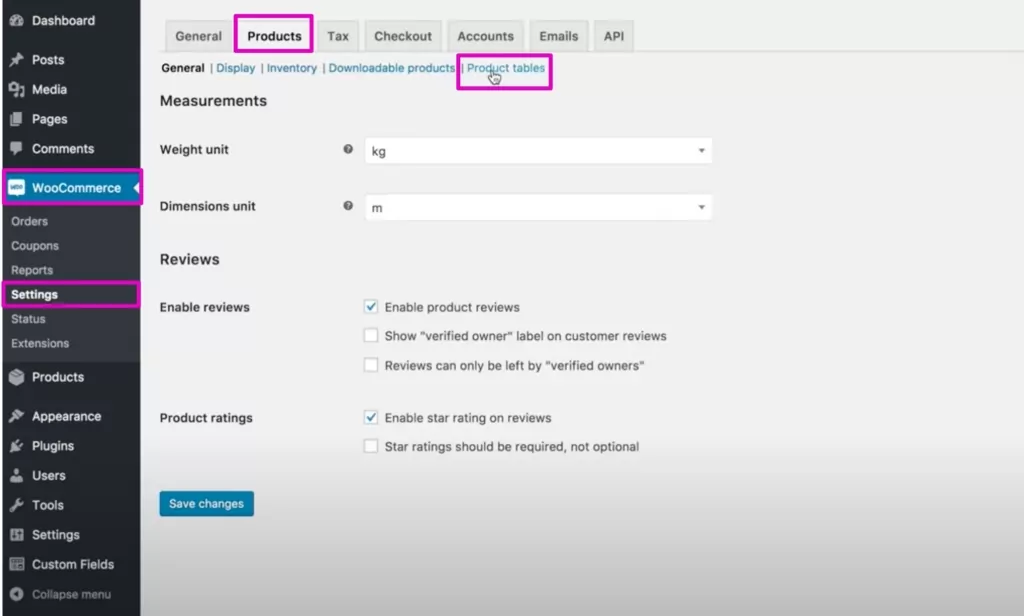
Here, you will need to enter the license key that you received when you purchased the plugin. Save your changes and the WooCommerce Product Table is ready to go.
Now, create a new page and give it whatever name you want (for example: “Our products”). If you can only see one row of icons, click the icon labeled Toggle Toolbar. In the second row of icons that appears, choose Insert Product Table.
This will place a shortcode on your page, which will automatically generate your product table. It will include all of your WooCommerce ‘products’, in this case, your dishes, drinks, etc. If you check it in the front end, it should look like this:
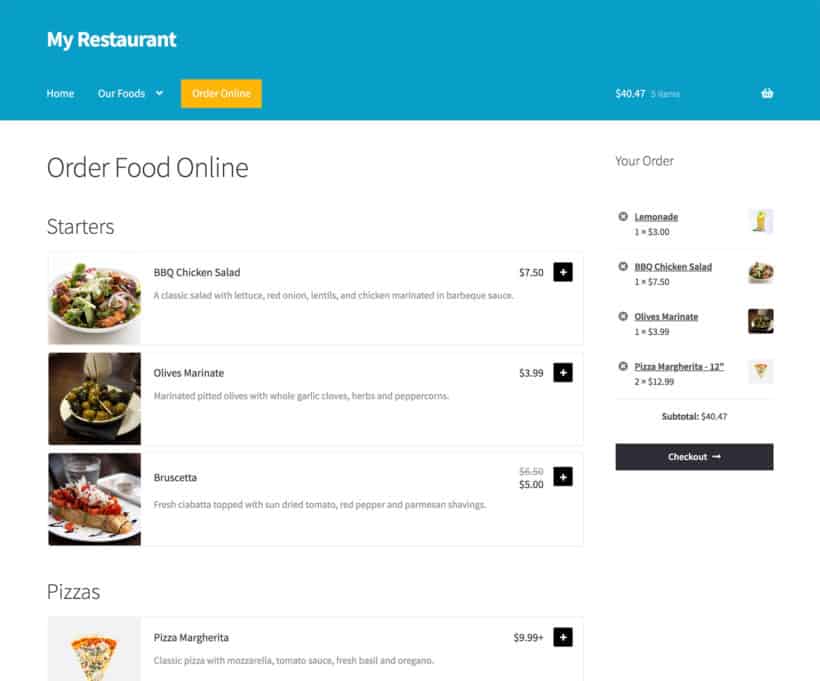
It’s a bit basic right now, but don’t worry. You can fully customize your ordering system to add exactly the information and functionality you want. Save this page for now and we’ll explore how to do that later.
Step 2 – Customize your food ordering system
At this point, you’ll want to switch back to WooCommerce> Settings> Products> Product tables . This is where you can make changes to the product table and turn it into a fully functional online menu.
There are a lot of options here, so let’s look at some of the most important settings. First, you’ll want to review the Columns section:
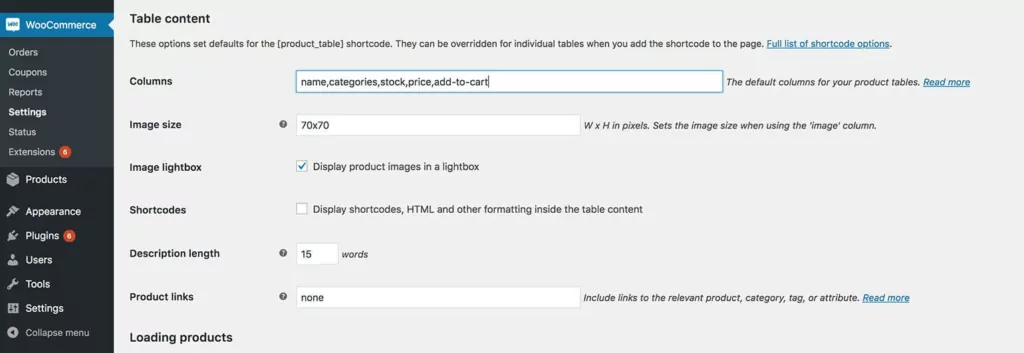
As the name suggests, this is where you decide which columns will appear in your products table. For a restaurant ordering system, you’ll probably want to keep things simple. We suggest including an image, name, description, price, and an add to cart button for each item.
Just below that, you can check Box quantity selectors . This feature will allow customers to order more than one of each dish.
Scrolling down the page, open the Add to Cart Button menu and select Button and Checkbox .
This is essential to make your ordering system easy to use. Thanks to this option, customers will be able to mark all the foods they want and add them to their cart with a single click.
You may also want to enable both variations and filters. The Product Variations field will allow you to display options within your product table. So if you offer multiple variations on a single dish, for example, you can display each one on its own line or in a dropdown list.
Filter Dropdown will add menus to the top of the product table, allowing customers to filter by specific types of dishes.
There are many more options here to explore, all of which are explained in the WooCommerce Product Table documentation. don’t forget about Save changes at the bottom of the page when you’re done.
Finally, it’s also worth noting that you don’t have to stick with just one product table for your WooCommerce restaurant ordering system. You can create multiple tables and add them all to the same page, each showing offers from a different category. This allows you to separate your appetizers, main dishes, drinks, etc.
Step 3 – Extend your restaurant ordering functionality with additional plugins
However, before you go live with this new feature, you may want to consider adding some additional features. While not required, these options will provide additional information to customers and make the ordering process more convenient.
For example, most online stores operate 24 hours a day, 7 days a week. However, you’ll only want customers to place orders during your business hours. You can take care of this using the WooCommerce opening hours and chosen hours.
With this tool, you can decide exactly what hours you would like to offer online ordering. If a customer visits your ordering system outside of these hours, a message will be displayed informing them that your restaurant is closed (and letting them know when it will reopen).
WooCommerce restaurant order form lists meal variations or add-ons for each item. This is fine if you only have a few options for each food item, but often you will have too many options to fit on a one page food order form and you will need to visit a separate page for each item. WooCommerce Pro Quick View, the plugin adds additional ‘Quick View’ links to the restaurant order form.
Instead of customers having to purchase their items directly from the order form, they click a button to see the purchase options in a quick view popup. They simply click the quick view button for each item, select the desired options and immediately return to the order form where they can continue adding food to the cart, making it much more user friendly. This is the perfect companion to the WooCommerce Product Table.
This plugin allows customers to select a delivery date and time slot for their order. As a bonus, it also helps you keep the number of orders you accept each hour to a manageable level.
Conclusion
Setting up an online ordering system for your restaurant can seem a bit intimidating at first. Even though you know your customers would love the option to shop for groceries through your website, you may not be sure how to get started. However, you can drastically improve your chances of success with careful design and the right tools.
In summary, here are the steps you’ll want to take once you’ve set up WooCommerce:
- Install WooCommerce Product Table and list your foods on a one-page order form.
- Customize your restaurant ordering system
- Expand the functionality with additional plugins like WooCommerce opening hours and chosen hours and WooCommerce Delivery Slots
Do you have a question about how to create an ordering system for your restaurant, or are you looking for professionals who can create it for you? Get in contact with us!